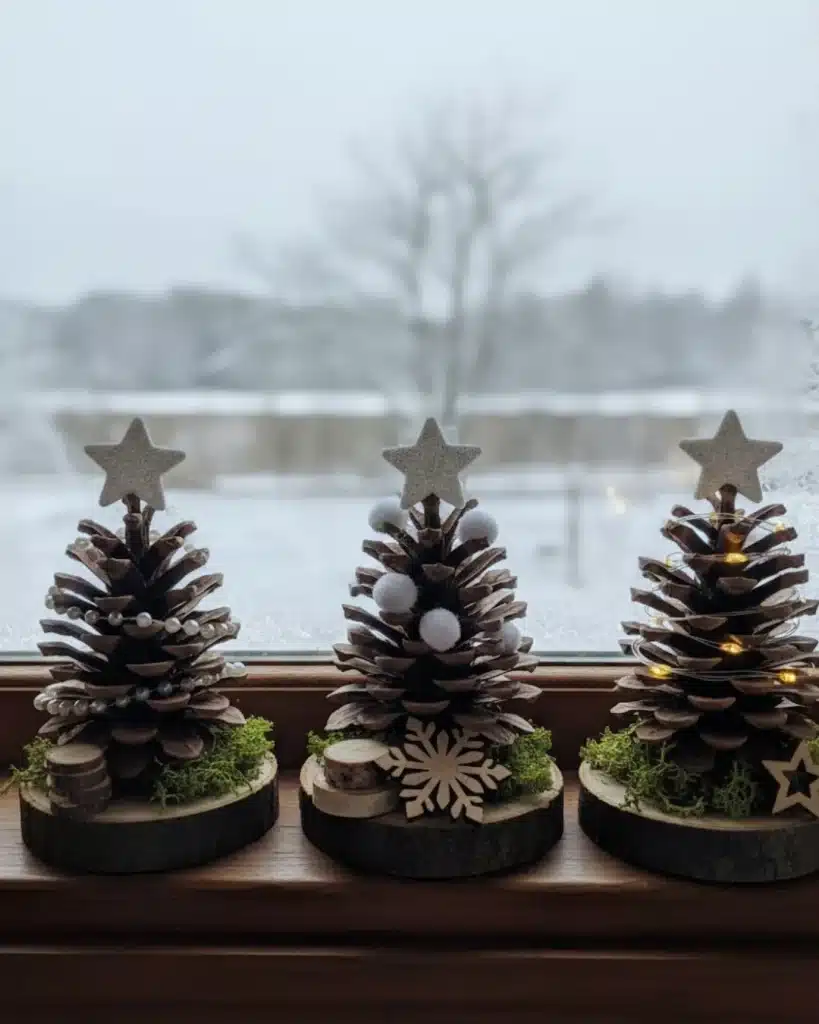
Did you know that nearly 67% of people prefer handmade decorations for the holidays? There’s something truly heartwarming about crafting something yourself — especially when it’s as adorable as tiny pinecone Christmas trees! I still remember the first time I turned a pinecone into a festive tree… it was messy, chaotic, and absolutely magical. Whether you’re a seasoned DIYer or just someone looking for a cozy weekend project, this guide is packed with fun, budget-friendly ideas to light up your holiday season. Let’s dive in and get crafty with pinecones!

Gathering the Right Pinecones for Your Mini Christmas Trees
Alright, let’s talk pinecones — the unsung heroes of DIY Christmas crafts. When I first started using them in my holiday decor, I made the classic rookie mistake: grabbing the first ones I saw on the ground. Big nope. Some were damp, full of bugs (yikes), or straight-up crumbling. Trust me, picking the right pinecones makes or breaks your magical mini trees.
Size Matters (But Not Too Much)
Go for small to medium pinecones. You want something that stands upright easily and mimics the shape of a real Christmas tree. Too small, and you’ll be squinting while gluing on a mini star. Too large, and it’ll just look like a spiky blob in your centerpiece.
Where to Find Them — For Free or Nearly Free
If you’re lucky enough to live near a wooded area, take a stroll! I usually go pinecone hunting in late October, right before the cold really kicks in. Bring a basket and wear gloves. Look for ones that are already opened up — those are dry and easier to work with.
No trees nearby? No problem. Craft stores sell cleaned pinecones, or you can order them online. I once bought a bulk bag for under $10 that lasted me two holiday seasons!
What to Avoid (A Hard-Learned Lesson)
Skip green or moldy ones. If they’re damp or smell weird — toss ’em. One year, I used a bunch without checking, and two weeks later, mold hit my whole table display. Lesson learned: inspect every pinecone like it’s going in a gourmet recipe.
Quick Tips for Success
- Choose symmetrical pinecones—they look more like tiny trees
- Give them a little shake to see if bugs fall out (yes, gross, but necessary)
- Test balance: if it tips over, don’t bother
- Pro tip: pinecones from longleaf pines or ponderosa pines are the MVPs
And here’s a hot tip: pinecones can vary by region. Some have longer “branches,” some are more compact. Play around and mix types for a rustic forest look.
Oh, and don’t forget to grab a few extras—you’ll always mess up at least one (or three).
Next up: how to clean and prep them without losing your mind. That part involves baking. Yup, baking your pinecones. Stay tuned.
Cleaning and Preparing Pinecones Before Decorating
Alright, real talk — if you skip this step, you’re gonna regret it. I learned the hard way when I made a batch of glittery pinecone trees and a few days later, tiny bugs started crawling out… right onto my holiday home decor table. Not the festive vibe I was going for. So yeah, cleaning pinecones isn’t optional — it’s essential.
Why You Have to Clean Pinecones
Nature is messy. Even the prettiest pinecone can hide sap, dirt, mold spores, or worse — live bugs. You don’t want to spend hours crafting only to have a spider pop out during dinner. Plus, clean cones hold paint better and won’t flake apart while you’re decorating them.
Two Foolproof Ways to Clean Pinecones
1. The Bake Method (My Go-To for Fast Results)
- Preheat your oven to 200°F (about 95°C).
- Line a baking tray with foil (trust me, the sap gets sticky).
- Spread your pinecones out and bake them for 45 minutes to an hour.
- Keep the oven door slightly open to let moisture escape — and watch them, because they can burn if you forget. Learned that the smoky way.
Bonus: Your house will smell like a forest!
2. The Soak Method (If You’ve Got Time)
- Fill a bucket or sink with warm water and a splash of vinegar.
- Let the pinecones soak for 30 minutes, then rinse thoroughly.
- Leave them out in the sun for a day or pop them in the oven to dry.
It’s a little slower, but it gets rid of pests and softens sap.
Drying is a Must — Don’t Skip It
Whether you bake or soak, your pinecones must be dry before you start decorating. Wet cones mold, shrink, or fall apart. Been there. Plus, nothing ruins Christmas crafts faster than soggy supplies.
Line a tray with paper towels and let them sit in a dry, warm spot for at least 24 hours if air drying. I usually stick mine on a sunny windowsill — it makes the house feel cozy and festive, even before the crafting starts.
Optional Touch: Trimming & Sanding
If your pinecones are super prickly or uneven, you can:
- Snip off pointy tips with wire cutters
- Use sandpaper on the base so they sit flat
This helps when you’re making pinecone decorations that need to stand upright (like those cute mini trees for mantels or tables).
Cleaning pinecones isn’t the most glamorous part of DIY Christmas crafts, but it’s what makes your project last longer and look way more polished. It’s like prepping a canvas before you paint — no one sees it, but it makes everything better.
Up next, let’s talk about the fun stuff — painting, glitter, and mini ornaments. That’s where the magic happens.
Decorating Pinecones with Paint, Glitter, and Mini Ornaments
Now we’re talkin’! This is where your pinecones go from “forest floor freebies” to full-on Christmas tree decorations worthy of a Pinterest board. After all the scrubbing, baking, and bug-proofing, it’s finally time to make these babies sparkle.
Start with a Good Base: Paint
Let’s talk paint — because slapping any ol’ acrylic on your pinecone won’t cut it.
My Top 3 Paint Choices:
- Spray paint – Fast, even coverage. Metallic gold or forest green looks stunning for holiday home decor. Just do it outside unless you want a sparkly garage floor forever.
- Acrylic paint + sponge brush – This gives you more control. Great for adding “snowy” white tips to mimic frost.
- Chalk paint – Gives a rustic, matte finish. Pairs perfectly with neutral or farmhouse-style decor.
Pro tip: Stick your pinecone on a skewer or old wine cork when painting — no mess, no smudges, no regrets.
Bring the Bling: Glitter and Faux Snow
Alright, I’ll admit it — I have a glitter addiction. Once I start, there’s no going back. But trust me, a little sparkle goes a long way.
How I Glitter Without Going Overboard:
- Use a glue stick or Mod Podge just on the tips
- Sprinkle glitter while the cone’s still wet
- Shake off the excess over a paper plate (reuse that glitter!)
For a “snow-dusted” look, dab on white paint or baking soda paste. I once used flour in a pinch… wouldn’t recommend it. It got weirdly gummy.
Mini Ornaments: The Real Magic
This is where your pinecone becomes a mini Christmas tree for real.
Some Favorite Add-ons:
- Mini stars – Hot glue one right to the top. Boom — tree status achieved.
- Tiny pom-poms – Great for a kid-friendly look or colorful theme.
- Beads and buttons – Gives vintage vibes.
- Ribbons or twine – Wrap them like garland, super cute for DIY holiday crafts.
You can also glue the finished pinecone onto a base — think wood slices, bottle caps, or even little terracotta pots painted red or white. Makes them look polished, like something you’d pay $15 for at a boutique (but didn’t, because you’re a genius).
What I Messed Up Before (So You Don’t Have To)
One year I used a glue gun on still-wet paint. Everything slid off, and I had a pinecone graveyard by the end. So yeah — let each layer dry fully. I know, it’s hard to wait when you’re in the crafting zone, but your future self will thank you.
Decorating pinecones is hands-down the most fun part of DIY Christmas crafts. There’s no right or wrong way — just follow your theme and let your creativity explode (with glitter, of course).
Next up? Let’s figure out how to show these off like the tiny holiday masterpieces they are.
Displaying Your Mini Pinecone Christmas Trees
So you’ve cleaned, painted, glittered, and glued — now comes the fun part: showing off your mini masterpieces. I used to just stick them randomly around the house… and yeah, they got lost in the clutter. But with a little planning, your pinecone trees can become the star of your holiday home decor.
Create a Magical Table Centerpiece
I’m a sucker for Christmas centerpiece ideas — especially the rustic kind. I grab a wooden tray, add a few pine branches or faux snow, toss in a couple candles, and then place my mini pinecone trees right in the middle.
Tips for a Cozy Table Setup:
- Use different-sized pinecones for variety
- Add fairy lights around the base for extra sparkle
- Layer with cinnamon sticks, cranberries, or pine needles for scent and texture
Last year, I added a couple small glass cloches over my favorites — made them look super fancy without spending a dime.
Turn Them Into Tree Ornaments
Yup, you can turn these mini trees into actual ornaments. Just hot glue a loop of twine to the top or stick a hook in the base. I made a dozen one year and gave them away as gifts. People loved the personal touch — and honestly, they looked store-bought.
Use as Gift Toppers (So Dang Cute)
Want to win the wrapping game this Christmas? Tie a pinecone tree on top of your gift box. I did this for teacher gifts one year, and it seriously upgraded the presentation. Plus, it’s like two gifts in one — pretty package and an ornament they can hang.
Decorate Your Mantel or Bookshelf
These little guys are perfect for mantels. I mix them with candles, garlands, and old books for a cozy, layered look. One tip: use different finishes — matte, glittery, painted — so it doesn’t look too matchy-matchy.
Also… don’t forget the bathroom. Sounds weird, but I’ve got a mini forest on the back of the toilet. Unexpected and adorable.
Make a Pinecone Forest on a Tray
Arrange 6–10 decorated pinecones on a tray with some cotton batting for snow, and boom — instant winter wonderland. Kids love it, and it’s safe enough to set on a coffee table without worry. My cat even leaves it alone (rare).
Common Mistakes to Avoid
- Don’t overload your display with too many colors — stick to 2–3 shades
- Skip scented pinecones if you’re using real candles nearby (fire hazard, y’all)
- Use a glue dot or tacky putty to keep them in place on slippery surfaces
Displaying your DIY pinecone decorations doesn’t need to be complicated. With just a little intention, they can totally elevate your holiday table decorations or mantel setup. And hey — don’t forget to snap some pics and share ’em online. These little trees deserve the spotlight.
Next up: let’s bring the kids in! We’ll go over how to make this craft super fun and safe for little hands.
Kid-Friendly Pinecone Tree Crafts
Let’s be honest — any craft involving glitter and glue is already a hit with kids. But pinecones? They’re extra fun. Crunchy, weird-looking, and kinda magical. My kids call them “pokey trees.” Every year, we do a family craft night, and these mini pinecone Christmas trees are always a favorite. They’re easy, cheap, and safe (if you prep them right).
Keep It Safe (and Mostly Mess-Free)
When crafting with kiddos, safety (and sanity) come first. Ditch the hot glue gun unless you’ve got older kids and full supervision. Instead, use:
- Tacky glue or school glue – safer and dries clear
- Non-toxic paint – avoid anything with strong fumes
- Craft trays or paper plates – saves your table, trust me
I made the mistake of letting my daughter paint on a paper towel once… and yep, it stuck to the pinecone. Lesson learned.
Super Simple Supplies Kids Love
No need for fancy craft store runs. Just raid your junk drawer or dollar store bins for:
- Mini pom-poms – look like ornaments on the “tree”
- Pipe cleaners – twist them around like garland
- Googly eyes – turn your pinecone into a silly tree monster (yes, it’s a thing now)
- Stickers, buttons, sequins – more sparkle, less mess
- Cotton balls – for snow on the base or between the scales
One of my kids glued a tiny LEGO Santa to the top of her pinecone last year. Totally weird. Totally amazing.
Pinecone Craft Ideas for Different Ages
Toddlers (2–4 years):
- Use chunky brushes and let them paint the whole cone
- Stick on pom-poms or foam stickers
- No glue — just pre-glue dots for them to press onto
Kids (5–8 years):
- Let them add their own glitter, ribbons, and pipe cleaner stars
- Try making a group of three for a mini “forest”
- Great for school parties or Sunday craft time
Tweens (9–12 years):
- Get a little fancier with multiple colors or patterns
- Let them write names on tags and use the trees as place cards for dinner
- Turn into ornaments with twine or hooks
Make It a Holiday Tradition
Set up a “craft station” during your family holiday party. A table with paint, pinecones, and bowls of decorations turns into a magnet for kids (and adults, honestly). We did it last year and even the grandparents joined in.
Want bonus points? Print out little name tags or “artist cards” so kids can proudly display their creations. Makes them feel like true Christmas crafters.
What Could Go Wrong? (Because Something Always Does)
- Glitter will get everywhere — just accept it
- Someone will 100% glue a pinecone to the table
- Kids will fight over the last red pom-pom (have backups!)
But the smiles? The giggles? Worth every sticky, sparkly second.
These Christmas crafts for kids aren’t just fun — they’re memory-makers. You’re not just building decorations. You’re building traditions. And that’s the kind of magic every holiday needs.
And there you have it — from humble pinecones to magical mini Christmas trees, you’ve crafted something totally charming, totally personal, and totally holiday-ready.
We’ve gathered pinecones, cleaned and baked ’em (who knew?!), painted, glittered, and decked them out with everything from mini stars to googly eyes. Whether you’re decorating your mantel, topping gifts, or wrangling toddlers into a craft night, these little trees bring BIG festive vibes.
My advice? Don’t aim for perfection — just have fun with it. Each pinecone tells a story, and half the charm is in the quirks.
Now, do one more thing for me: snap a pic of your pinecone creations and pin them to Pinterest. Share the joy, inspire others, and maybe start a new family tradition while you’re at it.
Your next holiday obsession? Already in your backyard. 🌲


